We’ll start by taking a look at fishing on the bottom of the lake or river.
Ledgering is an old term used for fishing with your bait on the bottom of the lake/river. Many of the following associated terms, equipment names and tackle items may be new to you: pods, alarms, bolt rigs, running rigs, hair rigs, chod rigs, popped up, critically balanced, PVA, marker rods, spods, spombs, safety clips, baiting needles, clipped-up, method feeders, inline leads, pear leads etc. We will cover as many of them as possible throughout this section.
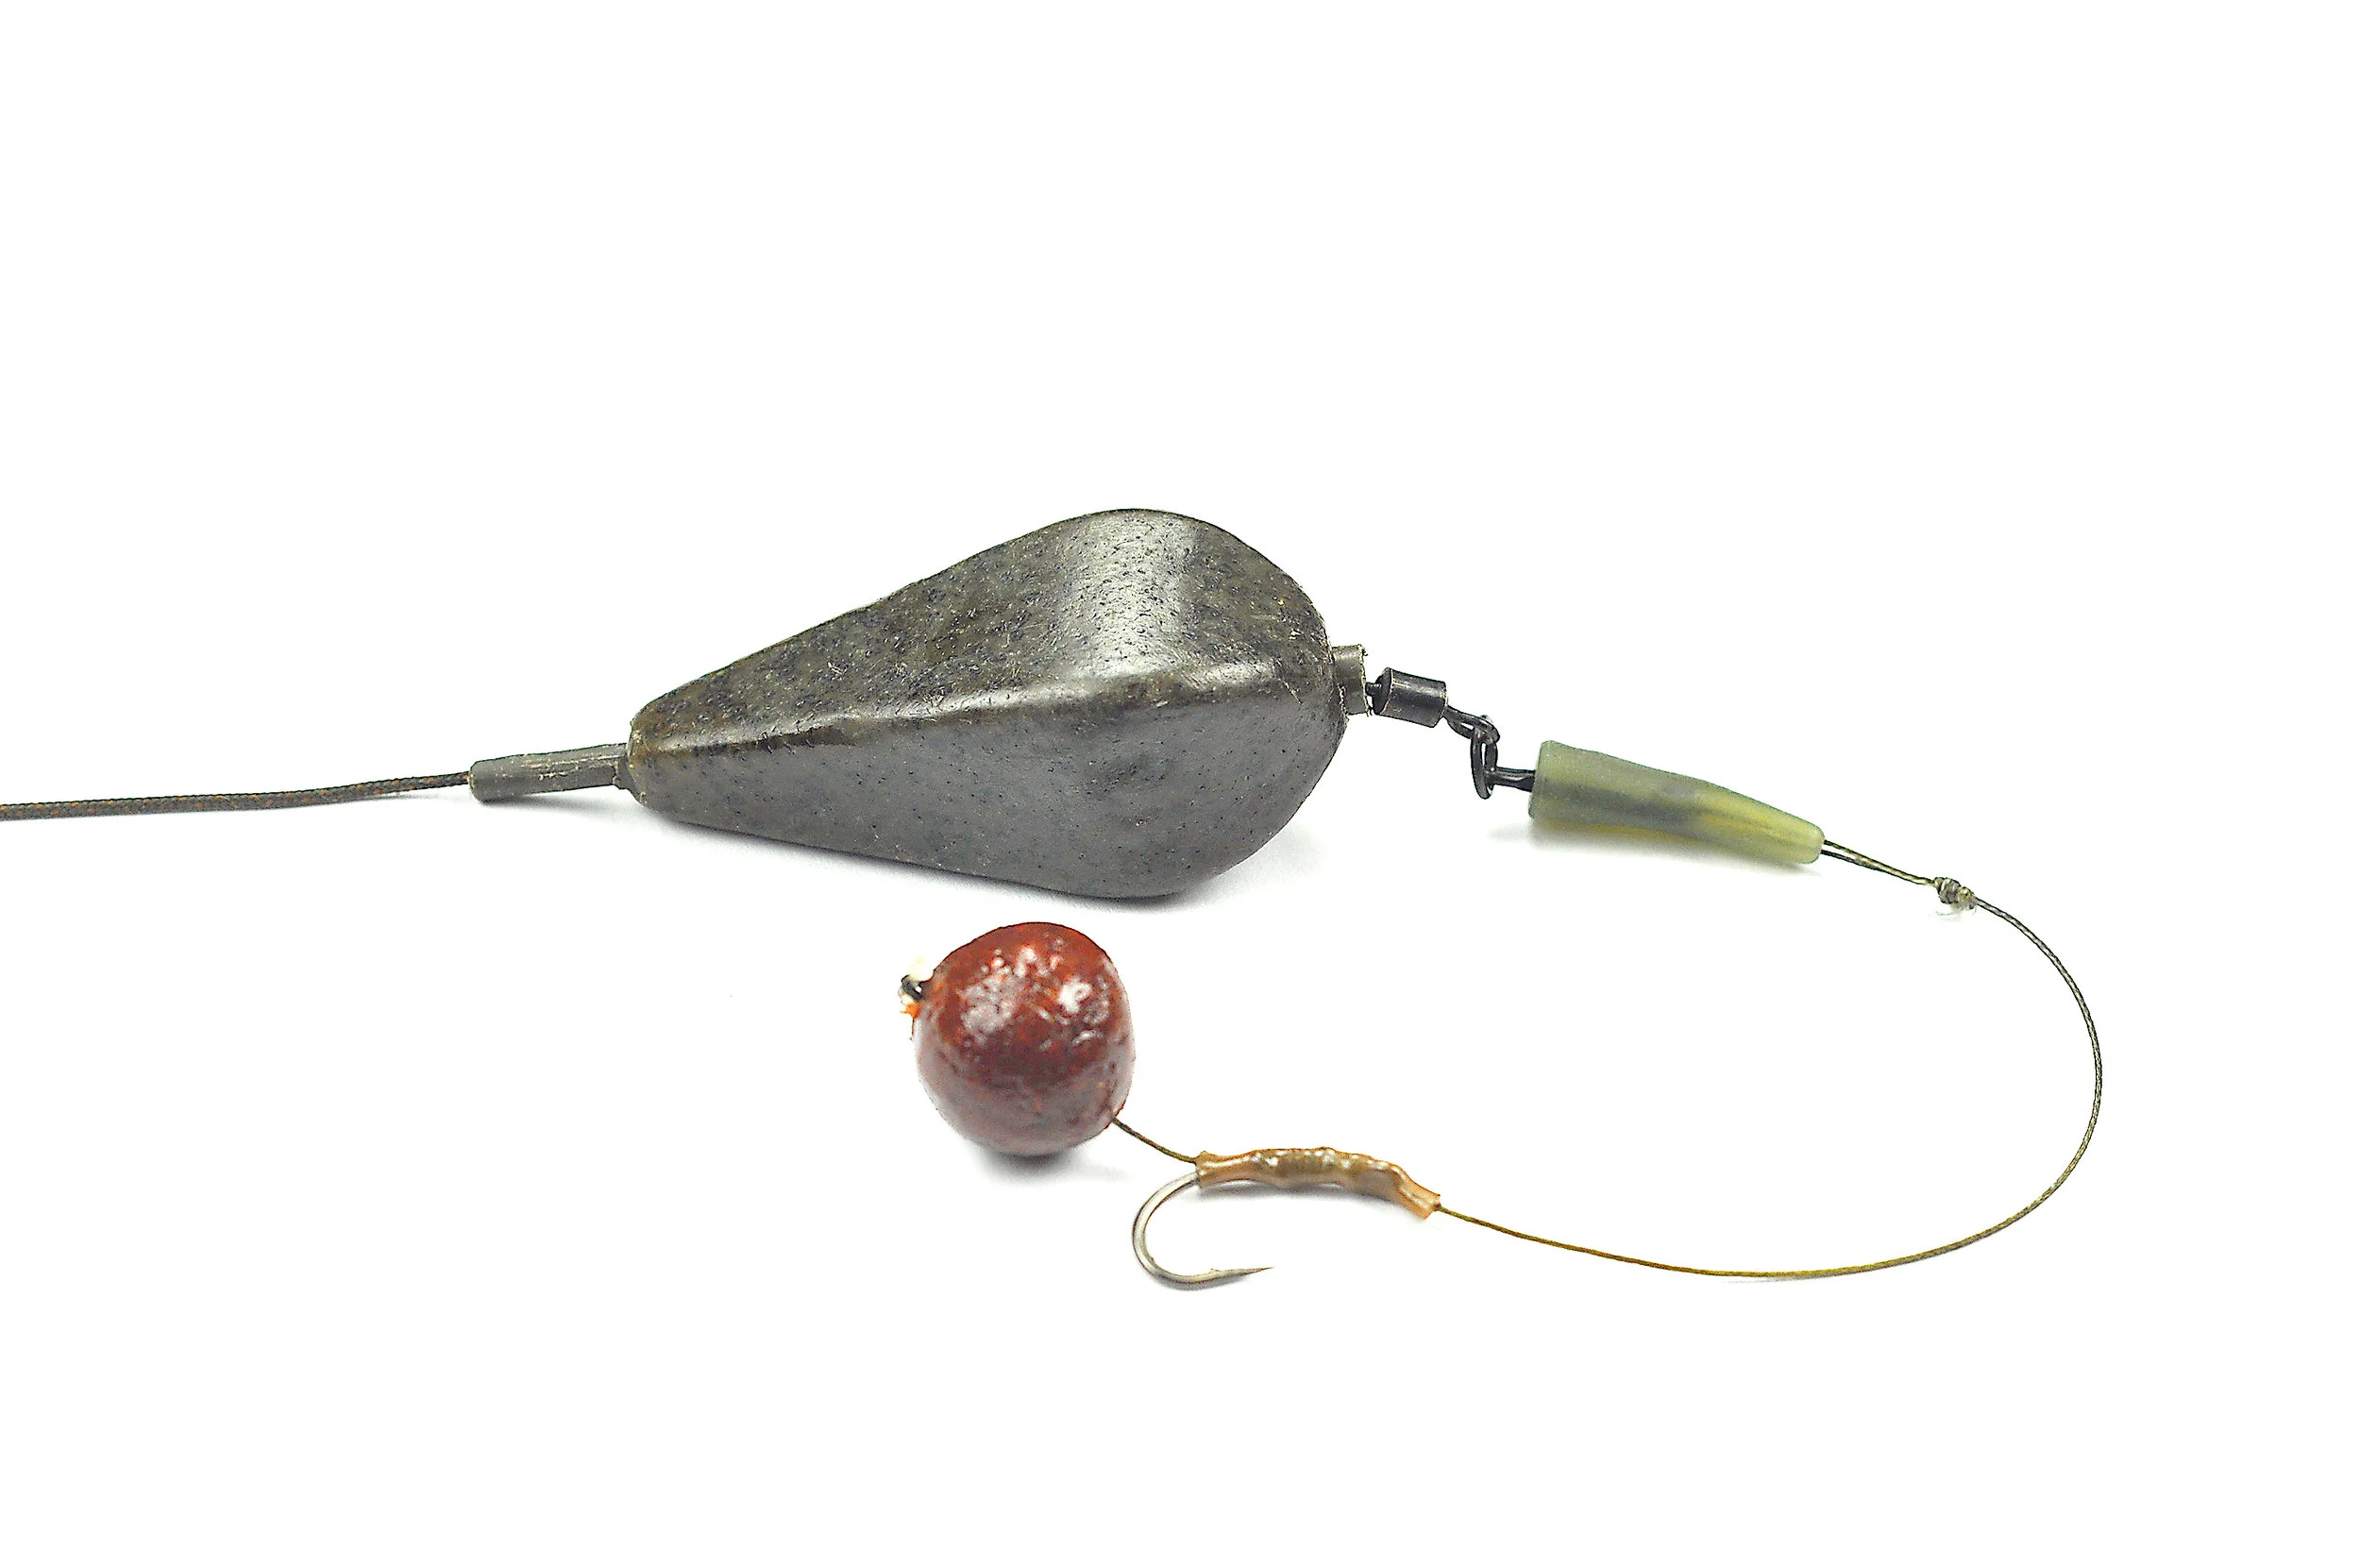
The official definition of the word ledgering is: "A lead sinker with a hole in one end or through the middle of a barrel shaped sinker through which the line passes, enabling the bait and the sinker to rest on the bottom of the lake/river. This approach allows the fish to take the bait without feeling the weight of the sinker."
This is commonly known as a running rig. An excellent approach to catching Carp that many still use to this day, especially during the Winter months when Carp are typically more lethargic and bites are often a lot subtler.
Thus, there is a direct connection between your baited rig, line and bite indication system without the weight of the lead scaring the fish.
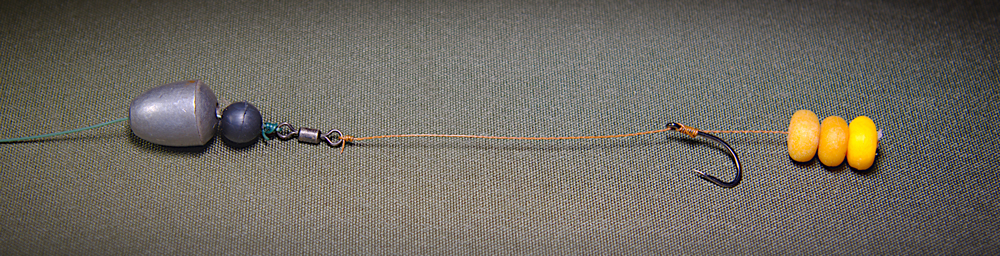
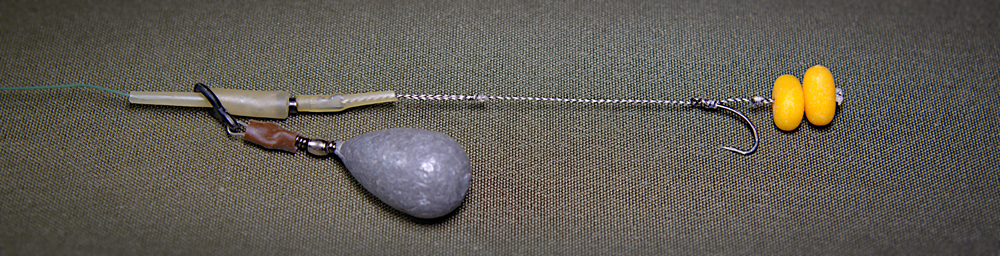
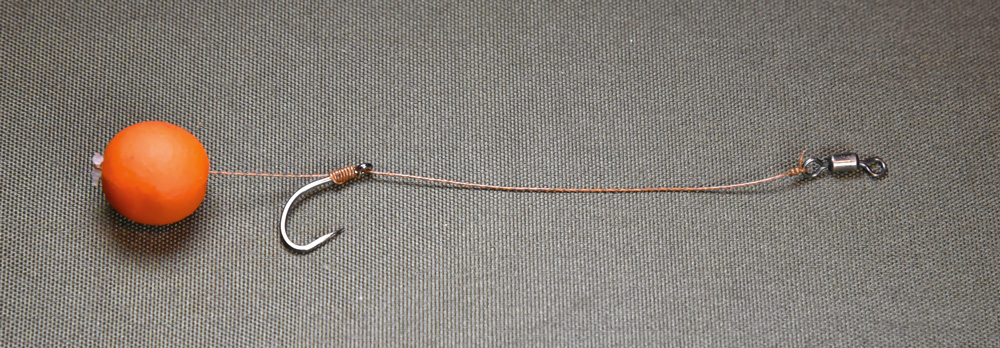
The two photos below show both a typical Egg Sinker Running rig and a variation that is designed to lessen the chances of tangles during the cast. Here is a link to our Rig Design section which shows running rig diagrams along with many other carp rigs.
+ HAIR RIG
Perhaps one of the biggest advantages of employing the "Euro" approach is gained by understanding the mechanics and using the hair rig. It can be used effectively in all 3 of the above (Ledgering, Float fishing and Surface fishing) scenarios.
The hair-rig specifically targets and really takes advantage of the way a Carp feeds and when tied correctly so that the hook turns during pick-up, it safely hooks 99.9% of the fish in the bottom lip. At first it was literally a human hair tied to the bend of the hook that had the bait mounted onto it, later very thin filament link was used.
When the super easy to tie knot-less knot was invented to make a hair rig, it again revolutionized Carp angling because it offered a way of both producing a hair and securely tying the hook to the hook length/mainline with one very strong “knot” without any strangle points on the line being used to tie the hair.
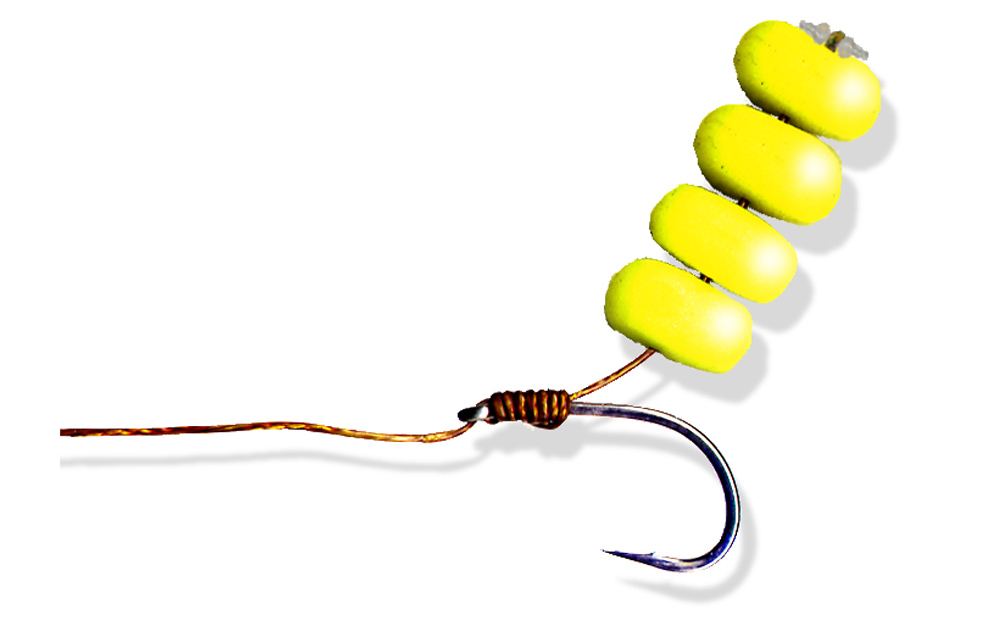
The Hair Rig is the foundation of most of the “Euro” rigs that use various hook length materials, rig rings, shrink and silicone tubing to make them even more effective in many varying conditions you may find yourself fishing in but even in its simplest "naked" form, it can be a game changer for the angler who learns the mechanics and how to tie it effectively.
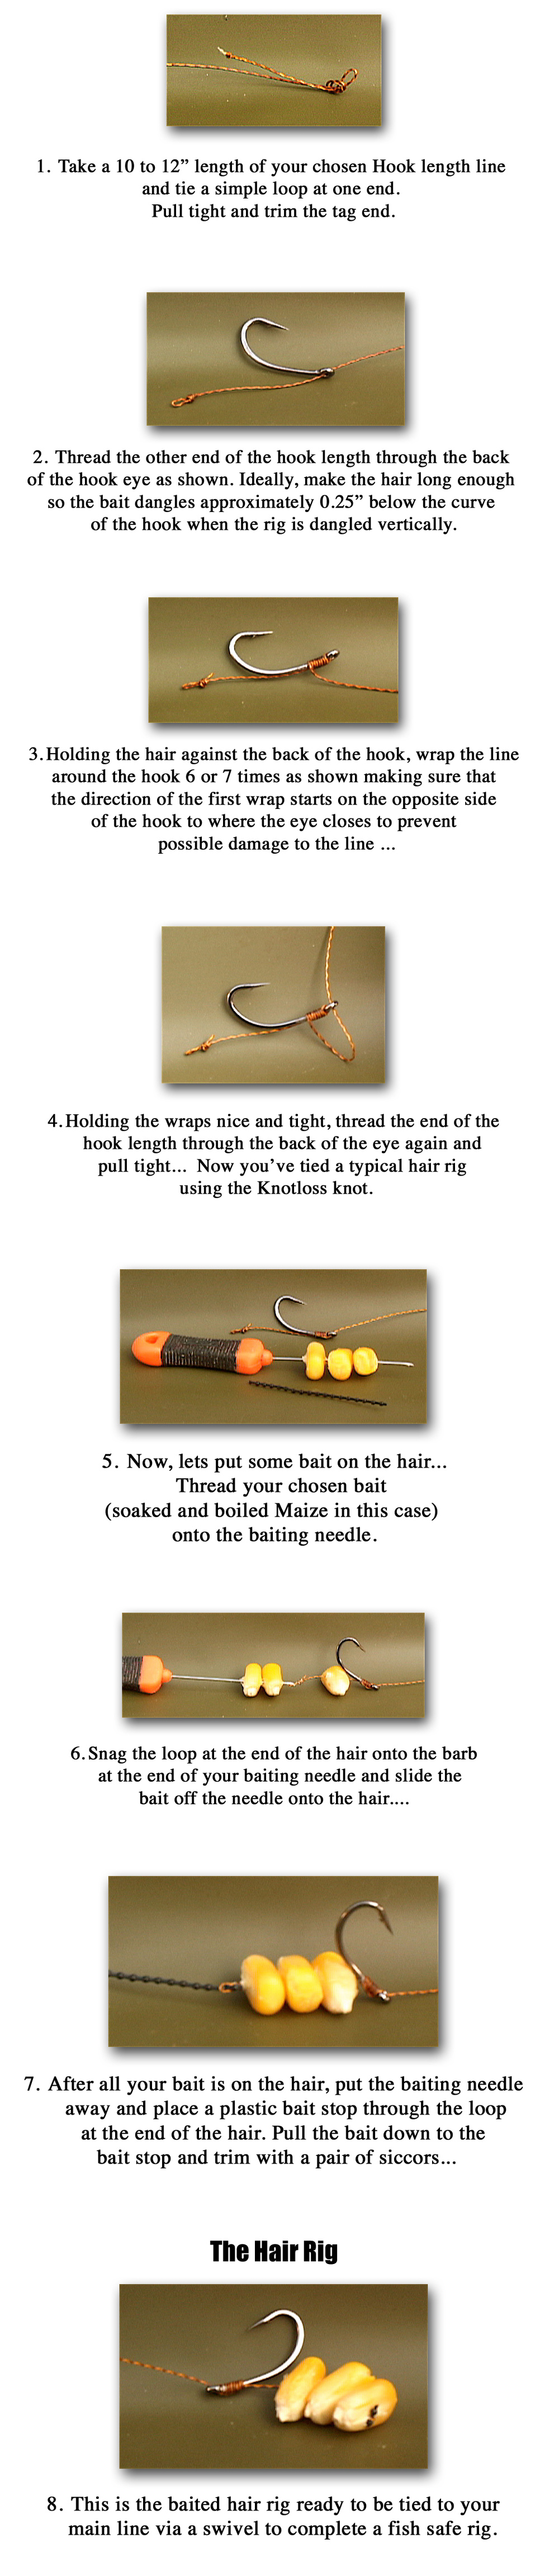
The mechanics of the hair rig are as follows: Carp feed by sucking any potential food along with much of the sand, sticks, mud etc. that's laying or floating around the immediate area into its mouth to inspect, before blowing it all out. Then often recapturing the food item quickly if it is a desired or needed by the Carp's metabolism. Carp rarely swallow the food item on first inspection, this is particularly so if it's not a recognized, naturally occurring and familiar food source in their lake/river, so this can happen several times before a decision is made to eat your bait. Carp are so efficient and stealthy at this process, that it very often happens without so much as a single bounce on your rod tip or movement of your line. Many blank or Skunk sessions have been declared by anglers who have had their hook-baits stolen or just simply picked up and spat out several times.
Not having hands and fingers to inspect the potential food item, this is how Carp learn. They have many taste sensing cells/sensors are in and around the mouth area and these sensors are how a carp learns about the food item, even sensing its calorific make-up (Carbs verses Proteins and minerals etc.) They are also instinctively inquisitive creatures and we can often use this to our advantage too. So, knowing these facts, helps us visualize how a Carp feeds and how better to tie an effective hair rig.
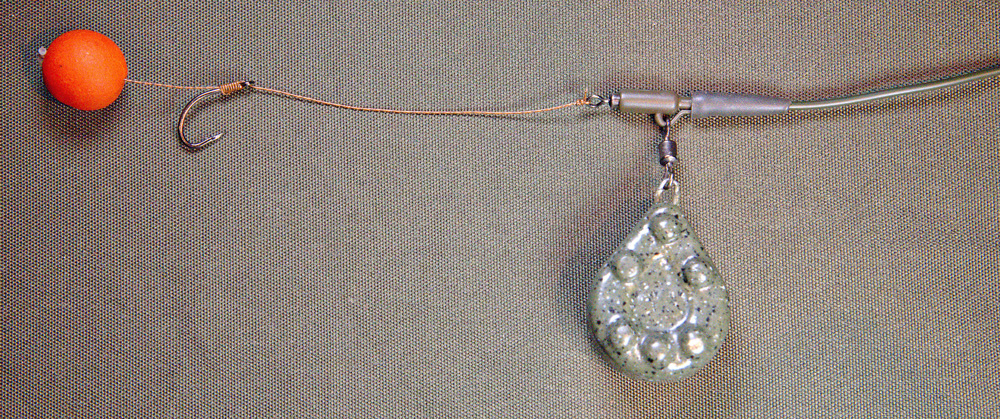
Let's now look at the actual mechanics of the hair rig. As can be seen from the above photos, the bait hangs below the bare hook. When the carp sucks in the bait, it will suck in the hook also, quickly followed by the carp blowing out the bait.
Next, because the weight and bulk of the bait offers much more resistance than the hook in the torrent of water exiting the carp's mouth during this "blowing out" phase of tasting process; the bait exits the mouth attached to the hair first dragging the hook behind it. The hook then pricks the bottom lip of the carp. Therefore hooks need to be "sticky" sharp when carp fishing because this light prick in the carp's lower lip will stop the hair rig from being fully ejected. The fish will then panic and what we call “bolt” (like a horse getting spooked and bolting off down the field) giving that precious few seconds for us to strike and set the hook properly.
To take extra advantage of this "Bolting" phenomenon, see the next section, Bolt Rig.
+ BOLT RIG
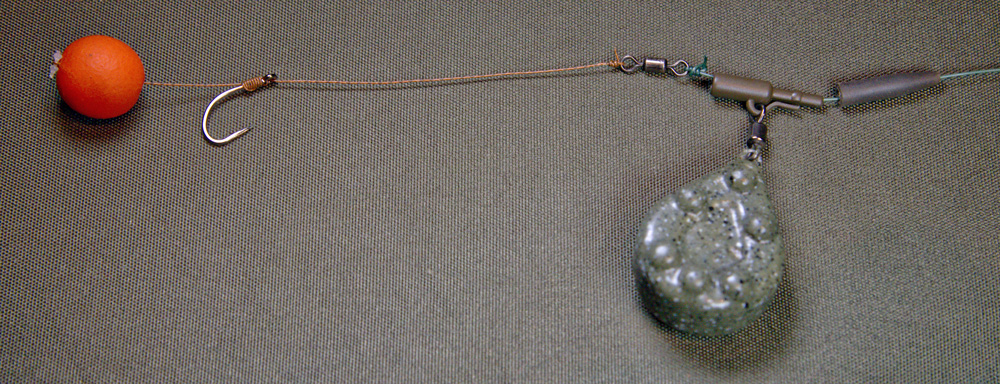
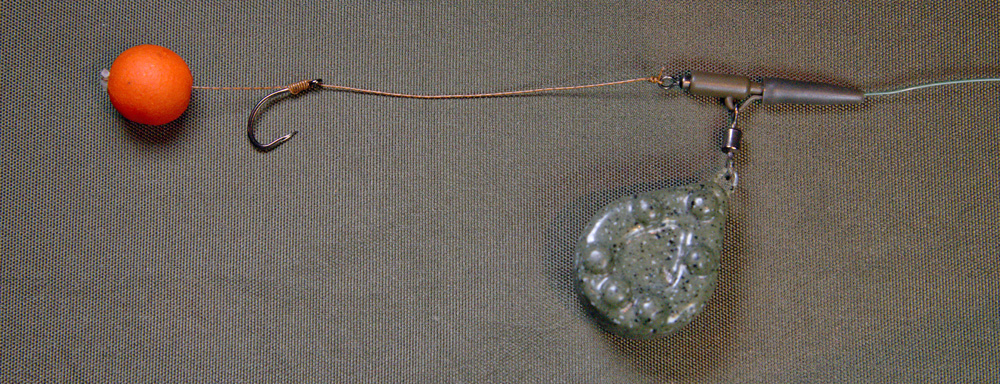
The Bolt rig is a rig designed to take full advantage of the Hair Rig's self-hooking properties and vastly amplify it. It does this by effectively adding a "dead weight" to the point of the hook, thus sinking the hook deeper in to the bottom lip, achieving a good hook hold when the fish bolts upon initial contact with the point of the hook.
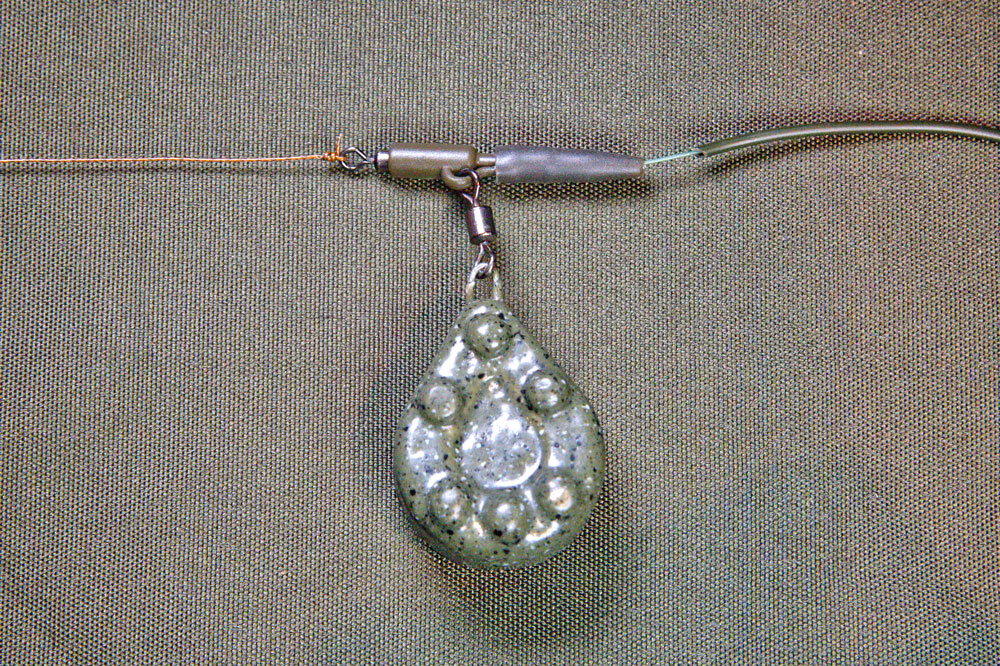
This "dead weight" is achieved by the attachment of a semi-fixed lead weight of anywhere between 2 and 5 ounces fixed via a special clip and swivel system threaded onto the line just above the hook-length as opposed to the sliding or running rig lead weight system.
As the images below shows, it can be tied and presented 2 two ways:
• As an 'in-line' lead weight but still carefully designed and constructed so that the lead weight can pull away in case of a break, so ensuring the safety of the fish. (See the 1st photo in slide show below).
A lead weight with swivel connected to the line via a safety clip as shown in the 2nd, 3rd photos; the 4th photo shows some alternative, component parts.
• By combining the mechanics of the hair rig above with that of the Bolt rig: The fish sucks in the bait, and attempts to spit it. The bare hook pricks its bottom lip and the carp “bolts” off. Now with a heavy semi-fixed lead in place, as the fish bolts the weight of the lead pulls the hook more firmly into its mouth and the fish is well and truly hooked before you have even seen the bite.
So instead of having to practically sit on our rods to hit runs that typically stop quickly when you're using the sliding/running rig, we can now take our time and gently lift the rod up to feel the strength of the carp that is already well connected to the other end of the line. The next phase of the capture begins; the skill needed to land and overcome the carp's infamous, encyclopedic knowledge of its underwater surroundings, including all the local snags along with its shear, unadulterated pound for pound fighting power! Good luck!
Here is a link to our Rig Design section which shows different bolt rig diagrams along with many other carp rigs.
+ HOOK LINK MATERIALS
There are several hook length materials out there specifically designed and made for Carp Angling! You may legitimately ask, “Why can’t I just use the same line as I have on my reel?” Well, you can and you’ll still catch carp, but there are several reasons for you to consider specialist hook-length materials.
Outside of all the marketing hype, the many different hook length materials have each been designed to overcome a certain situation when fishing over differing lake/river beds. To give you a better “edge” or to increase your chances of getting a good hook hold on that bottom lip!
We’ve got to visualize how our baited hook presents itself and acts when a fish comes into proximity to examine our offerings. There are plenty of underwater videos on DVD and on YouTube to help on this one.
There are 3 main choices to consider:
Stiff, Supple or a combination of both materials.
Stiff materials can be either plastic coated braids, high memory mono, co-polymers or Fluorocarbons dependent on their diameter and breaking strain.
It can be argued that stiff rigged systems are not yet needed here at home in the United States as they were developed and designed to combat very cautious Carp on highly pressured waters. Let us not forget, that our pay-lake brothers have been using stiff hook length materials for generations to great effect here at home.
Using stiff hook length materials make it harder for carp to eject the baited hook from its mouth and if you are using a fluorocarbon material, it makes the hook link almost invisible and so less suspicious. It has great anti-tangle properties, so can be cast great distances and you can be confident your rig is sitting “pretty” and effectively on the bottom of the lake/river.
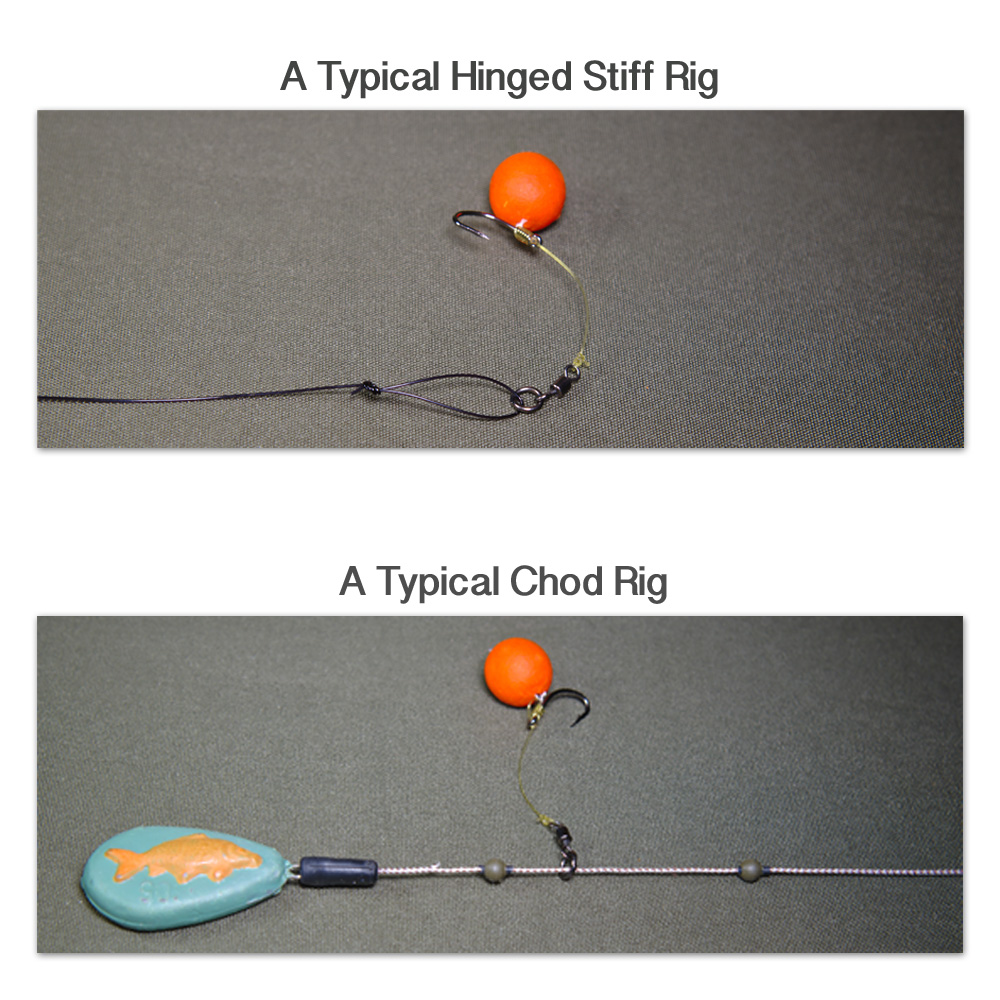
Shown below are two very popular rigs using various stiff hook length materials: The Hinged stiff rig and the Chod rig are both designed to be used primarily with a buoyant, pop-up bait but we have caught on them using bottom baits too. The only omission in these two photos is some tungston putty molded around the swivel to counter the buoyancy of the bait, we left this off so you could clearly see the type of swivel used. Details on how to construct these and many other commonly used rigs will appear shortly in the Rig Design section of our website.
Here is a link to our Rig Design section which shows different bolt rig diagrams along with many other carp rigs.
We should stress the subject and importance of Carp friendly rigs. It is very easy to produce a bolt rig incorrectly, known as a 'death rig' that can harm or even kill a fish.
+ CARP FRIENDLY RIGS - SAFETY CLIPS
The actual name of this important piece of terminal tackle (The Safety Clip) gives one of the main reasons for its use away but more on that in the following paragraphs…
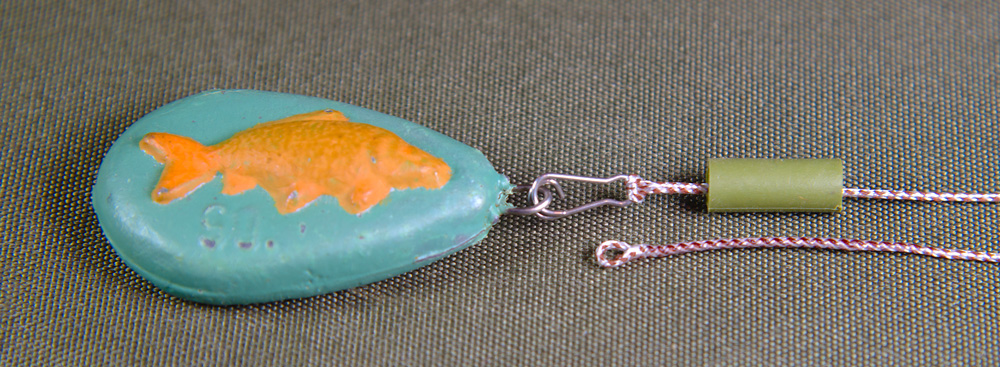
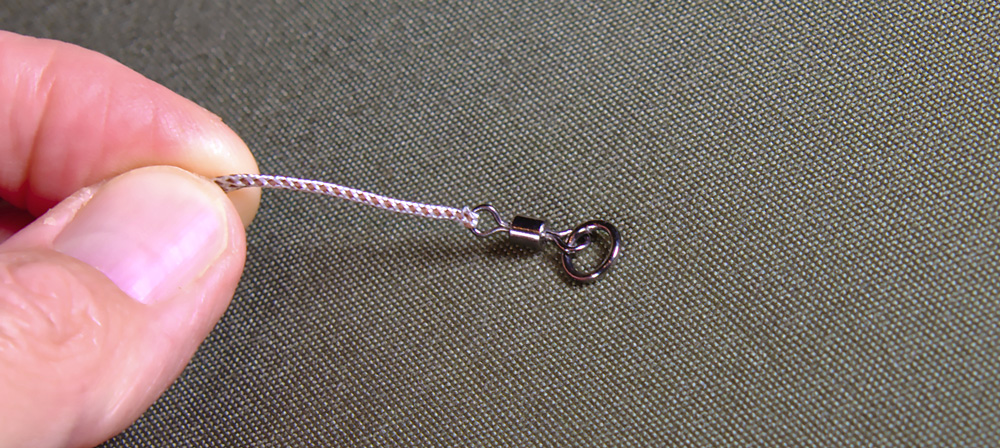
To be used effectively, the safety clips requires there main parts to fit together perfectly and working harmony. Four parts if you include the lead weight which ideally have a swivel attached to its wire loop. (see examples below)…
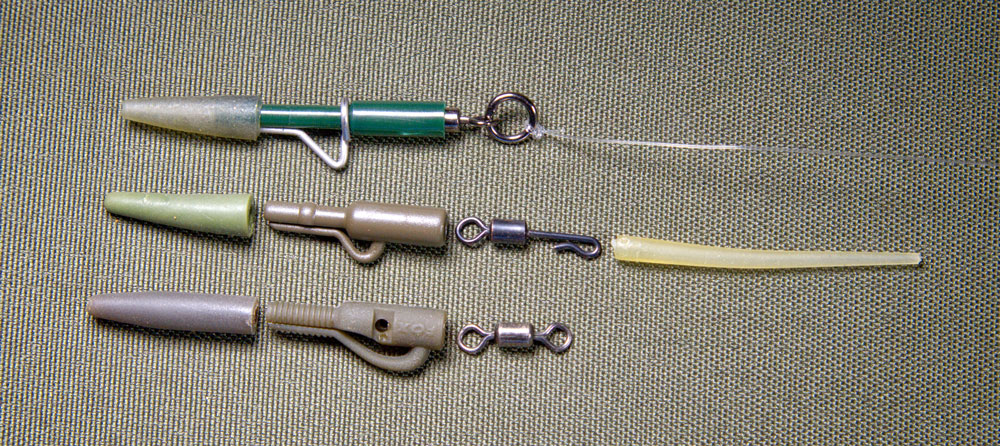 The three main parts are: A swivel, the safety clip itself and a tail rubber. Ideally, purchase all three parts from the same manufacturer as you will be guaranteed that they are all designed to fit and work together correctly. At the very least, make sure the same manufacturer has designed the clip and tail rubber, the swivel should be a size 8 but one or two clips are designed to take a size 7 swivel. Either way, the swivel should fit snuggly into the barrel end of the safety clip. Some models even provide a little plastic pin to hold the swivel in place.
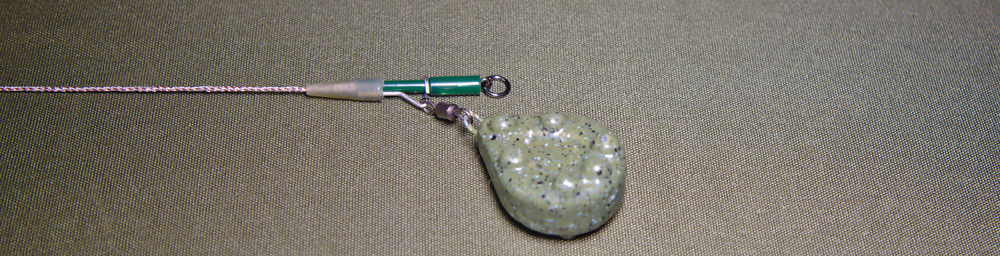
So what does the Safety Lead Clip actually do and how do we utilize it when we tie up one of our bolts rigs?
First, the clip should of course hold the lead weight securely enough during the cast to enable us to get our baited hook out to the desired location on the lake/river bed without the lead weight/sinker breaking away from the clip during the cast and potentially hitting someone or something on the far bank. Of course, if we’re using heavy lead weights and really compressing the rod for some serious distance casting, then a shock leader link to shock leader section should also be employed for extra safety to prevent crack offs (line snapping during the casting process, sending the rig heading uncontrollably towards the horizon somewhere).
The main line or shock leader should be threaded through the pointed end of the tail rubber first and then through the neck (thinner end) of the safety clip itself.
Clip and tail rubber threaded onto mainline.
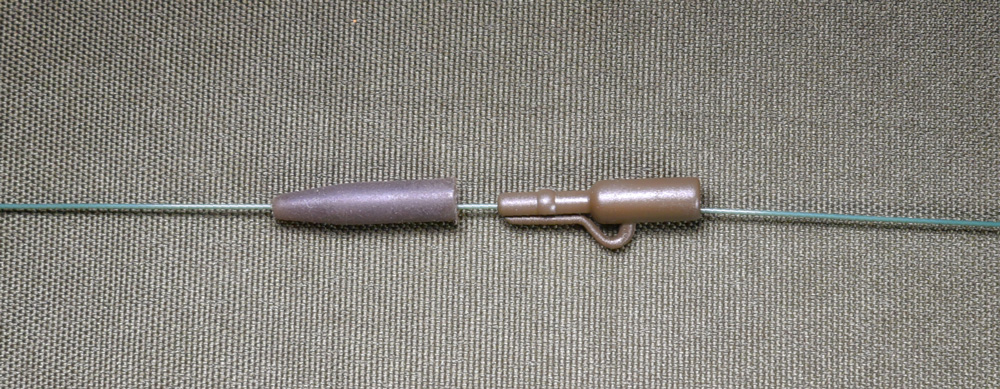
Having already threaded the Tail rubber and Safety clip onto the mainline/shock leader as noted above, the mainline or shock leader is then tied to the other eye of the hook length's swivel before firmly pushing the swivel into the safety clip barrel as illustrated. A typical hook length complete with a size 8 swivel is shown below.
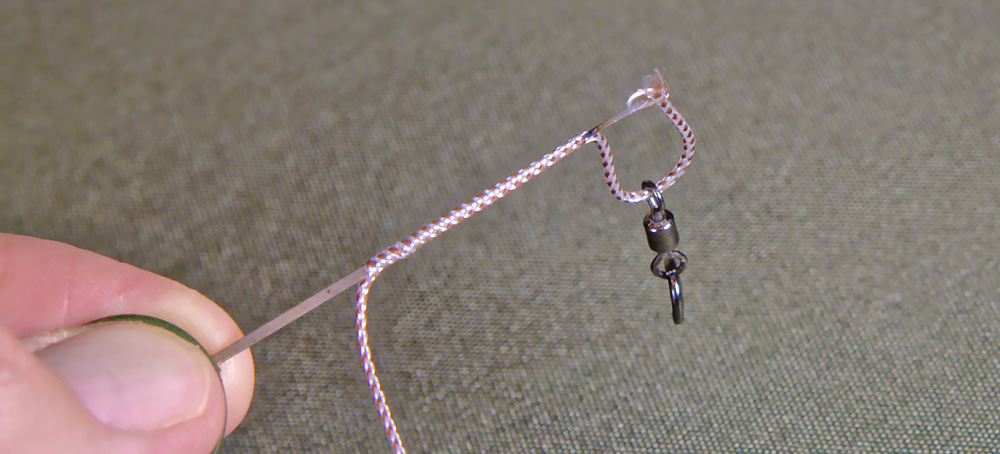
Some concerned anglers even take a further safety precaution by cutting the plastic retaining arm back a little to ensure the lead weight comes free from the clip in certain circumstances.
Cutting the clip arm back to ensure lead weight ejects if problems arise during the fight.

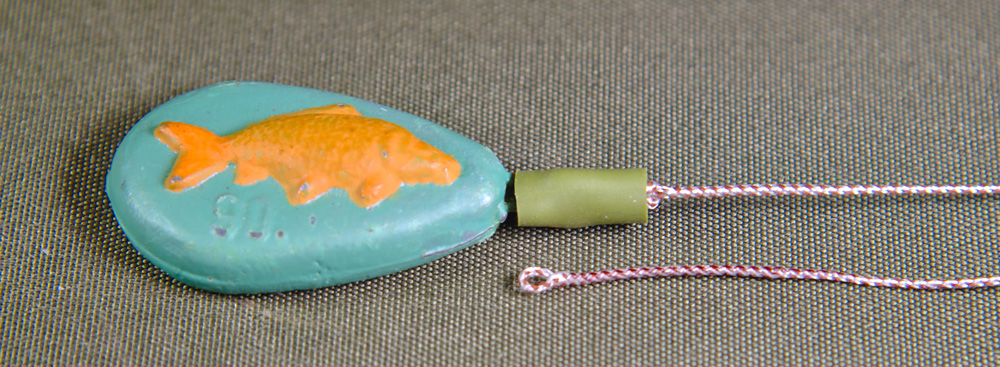
Next, we choose which lead weight to use based on the conditions we're fishing and attach it to the safety lead clip as shown below. Using a sinker/weight with a swivel already attached adds to the safety aspect of the rig as there is less likelihood of the weight getting jammed/stuck on the safety clip in the event of a breakage of the mainline with the fish hooked.
Now, one of the most important parts of the process; sliding the tail rubber over both the neck of the clip and the weight/sinker retaining arm. It slides on easier if the clip is lubricated with water or saliva.
The big question is, “how far do we push the tail rubber onto the clip?” Experience is the best judge and it does vary from manufacturer to manufacturer. It’s dependent on the materials the clip and tail rubber are made of but we’d recommend as a general rule, no more than 75% of the neck of the safety clip should be covered by the tail rubber once you’ve pushed them together.
Correct safety clip assembly.
Now that we have the Safety Clip and bolt rig together lets address the three main advantages to its use:
- As most anglers who regularly fish in and around weeds and other snags soon find out, it’s the lead weight/sinker that probably catches a tight hold of the weed/snag. How many times have you lost the fish in a weed bed and then dragged in about 50 LB of the green stuff? Or dragged the green mass in hoping to find a Carp buried in the middle of it all but somehow, the crafty carp has gotten away unseen. It’s not only frustrating, it is also very time consuming and a huge tax on all your equipment!
Here is what happens in probably 90% of these cases: Once this very smart fish dives into the weed bed or other snag looking for a haven, the weight/sinker catches a good hold onto the weed. Of course, we try to keep the line as tight as possible thinking we’re in direct contact with the fish… The trouble is, we’re not! We are tight lined to the weight/sinker in the weed but the other side of the weight (hook, hook length and of course the Carp) is slack lined giving the fish lots of room to shake the hook loose and swim off depriving us of the satisfaction of an awesome trophy photo shot and a great release story. Here is where the safety clip comes into its own, especially in this very weedy situation when the assembly recommendations above have been followed.
If you apply moderate pressure to the fish in the snags (well, the “locked tight in the weeds” weight/sinker), the weight/sinker should very quickly push the soft rubber tail off of the safety clip and actually break free of the clip. This will enable you to keep the line tight all the way to the hook point. Although the weight/sinker is lost, this will enable you to land and photograph many more fish that would otherwise have escaped unseen.
NOTE: An even better scenario is designing the rig so the lead drops off just as the fish bolts with the baited rig when you know weed banks/snags will definitely be involved in the fight. Some anglers achieve this by cutting the safety clip's arm way back, attaching the weight followed by the tail rubber. The weight is then secured with a couple of wraps of PVA string that then dissolves away in the water after the baited rig has been cast out.
- You can quickly and efficiently change the weight/sinker size or shape to suit the changing water/weather conditions you can often face during a session without having to change your whole terminal rig.
- The third and most important aspect of using this Safety Clip assembly is in actual fish care and safety: Think back to the last time you were fighting a large fish and heaven forbid, the mainline broke for whatever reason whether it be faulty equipment, old nicked or creased line, bad knots, abrasive lake/river beds (rocks or Zebra Mussels) etc. The Carp is going to be towing around the rig, complete with the heavy weight/sinker until it again gets snagged up on the bottom of the lake/river bed. Think of this as your pet dog chained up in the middle of your back-garden lawn, way out of the reach of his food bowl in the kitchen. If he can’t get free to eat enough food to serve his current metabolic needs, he is going to suffer a long and slow death!
But as in example #1 (in the weeds) above, because the weight/sinker is attached to the retaining arm of the clip and not directly onto the line, the buildup of pressure caused by the fish pulling will cause the tail rubber to pop off allowing the weight/sinker too easily work itself free of the safety clip, the fish will live to fight another day.
It’s a very simple and relatively cheap piece of kit that serves you, the fish and the bigger conservation/good stewardship picture well.
+ RIG TUBING
Rig tubing, which is also sometimes referred to as Anti-Tangle Tubing is made of a supple PVC plastic and is used directly above the Safety Clip on the mainline. Some newer versions of this tubing has tungsten added to the plastic during the manufacturing process to add weight, helping to pin the tubing down so it's hugging the lake bottom.
Note: Be careful not to confuse this more rugged PVC tubing with the silicone tubing often used in the hook length construction. Although the silicone tubing would do a similar job, it's almost impossible to thread the mainline through a 24" length of silicone tubing due to it's super supple nature and it's very unlikely to sit anywhere near flat on the lake bed.
As can been seen in the photos below, the mainline is threaded through approximately 18" to 24" of the Rig Tubing. The tubing is then pushed and seated into the end of the tail rubber on the safety clip; it can be secured with a dab of superglue.
Final assembly of the carp safety rig with rig tubing on the mainline:
Using a 18” to 24” length of Rig Tubing as part of your baited rig presentation has 3 main advantages:
-As an Anti-Tangle precaution during the cast.
-For protecting your lines from abrasion on very rough lake/river beds.
-Protection of the fish during the battle to land them. There is much less likelihood of you damaging the fish by lifting a bunch of scales off it’s flanks during the fight/landing process when Rig Tubing is used.
Many anglers don’t like using Rig Tubing simply because they find it a massive head-ache to thread the mainline through 2 feet or more of the tubing. It can be a hassle, especially with older mainline that is coiling. In this case, it’s probably time to renew the line on your reel anyways to prevent “lost fish heart ache.” Look for a tubing with an internal diameter of at least 0.75mm, 1 mm is best when using a 25-30lb mono shock leader.
Note: We find it hassle free when the mainline section that will be threaded through the tubing is first lubricated with Olive oil or similar. The mainline always passes through the tubing with little or no friction when lubricated like this…
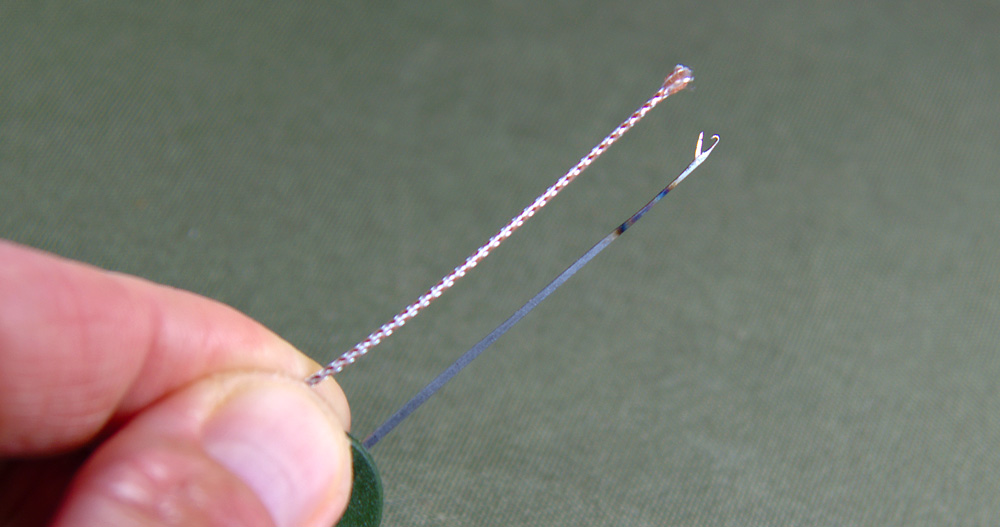
+ LEAD CORE
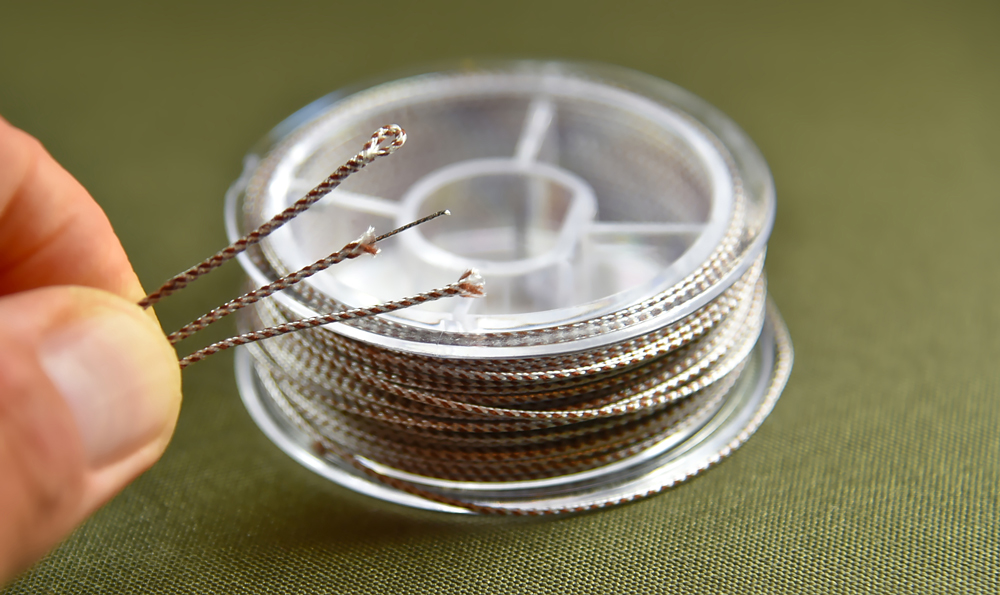
Leadcore is a product borrowed from the Fly fishing fraternity, so named because it literally has a lead wire core running down in the middle of the braided leader.
One of it’s main advantages is actually the lead core running inside the leader itself because the extra weight, it sinks fast and lays very flat on the bottom of the lake/river bed, even disappearing completely in soft silt, an advantage because nothing looks unusual to the fish examining your baits, so no suspicions are raised. It is necessary to fish with semi-slack lines so that the leadcore can do it's job and sit on the bottom of the lake bed so hopefully, wary fish's suspicions are not raised. If fished with very tight lines to the rod, then the leadcore will be at an acute angle coming off the weigh/sinker and not doing the job it was designed to do.
As in the Rig Tubing description above, lead core also has both excellent abrasion resistance from rough lake/river beds and also offers better protection for the fish during the fight than straight mono line. There are anglers who don’t use lead core because they believe it can be more abrasive to the flanks go the Carp but to be honest, we have not experienced this to be the case.
Photo showing the lead core inside the braided material and a finished, correctly spliced loop:
Leadcore is often used in the making of Chod rigs and Helicopter rigs, however there are often many battles of opinion as to how safe they are in relation to fish care when lead core is used in the construction of these rigs.
If any proplems with leadcore do exist, it is primarily due to poorly constructed rigs by inexperienced anglers who have not taken the time to study and understand the mechanics of these leadcore based rigs and how to properly construct them.
Pre-spliced Leadcore 3' and 4' lengths with loops on both ends are available from many carp tackle manufacturers and as such these are generally well made with the carp's safety in mind.
The 30 meter plus spools of leadcore that have to be cut into 36" lengths and spliced by the angler in order to form a loop at each end is often where the problem lies. This is because when poorly constructed, the loops and knots where the leadcore is joined to the mainline can be too thick and bulky for the soft rubber bead, hook length and it's swivel to easily pass over to free the fish of the weighted rig if the mainline should break during the fight.
Again to re-iterate: In the event of a mainline breakage, the the soft retaining rubber bead along with the size 8 ring swivel that the hook length and baited hook is attached to, has to be able to slide up along the lead core and over the spiced loop for the fish to easily rid itself of the weighted end tackle to prevent itself from being tethered to a lake bed snag.
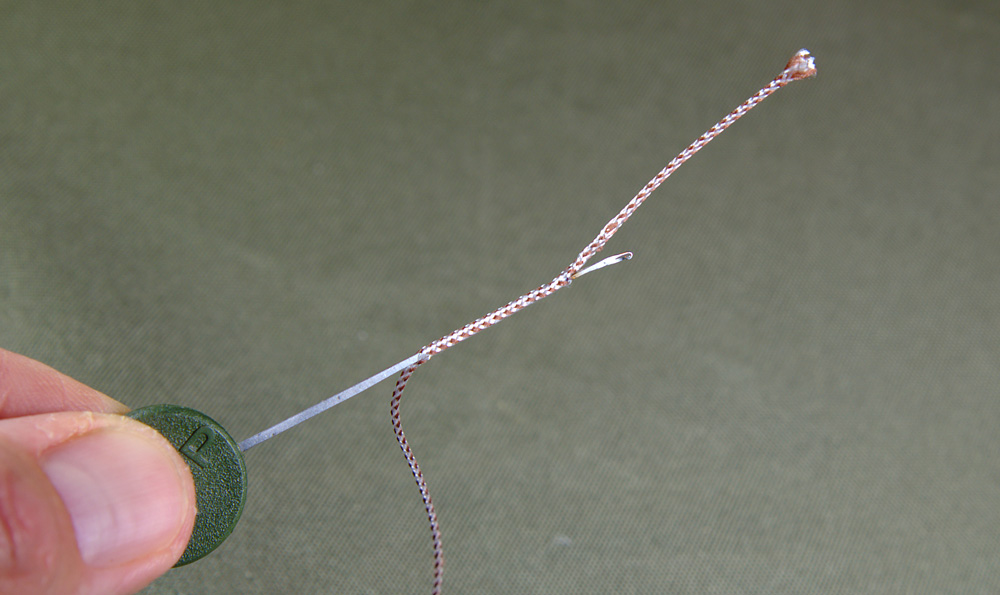
To create a fish safe length of leadcore, follow the construction photo guide-lines below:
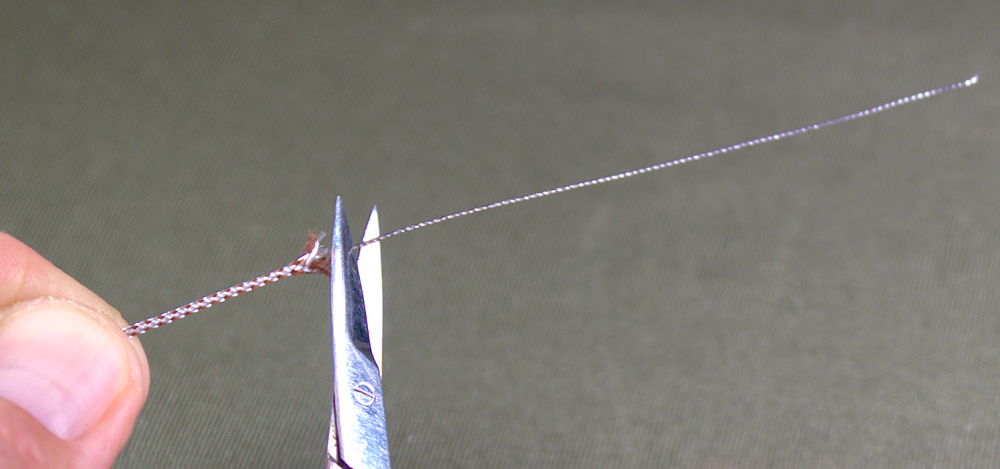
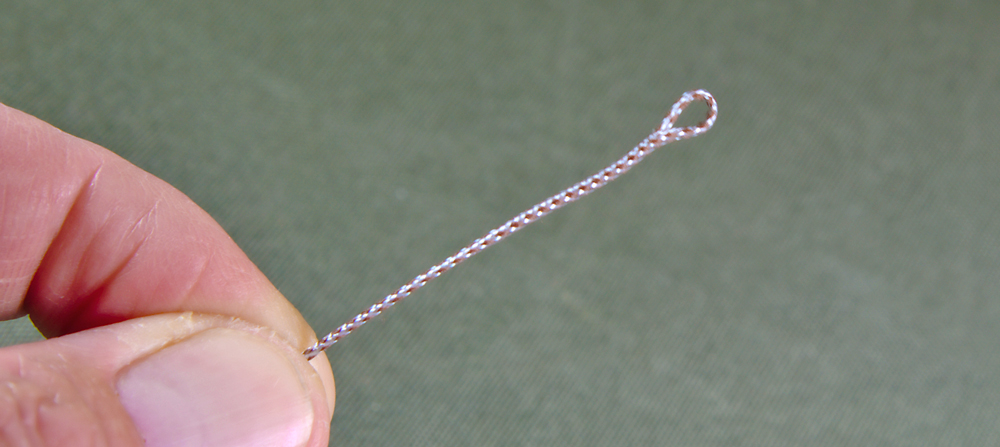
Cut a 36" length of leadcore from the spool, pull back the braided outer coating about 3" and snip off the inner lead wire. Then ease the braided coating back so that there is now 3 inches of hollow braid at that end.
Note: Save this lead wire and keep it in your kit box. It's very handy for weighing down rig tubing or just for counterbalancing baited rigs instead of using split shots or expensive Tungsten Putty etc.
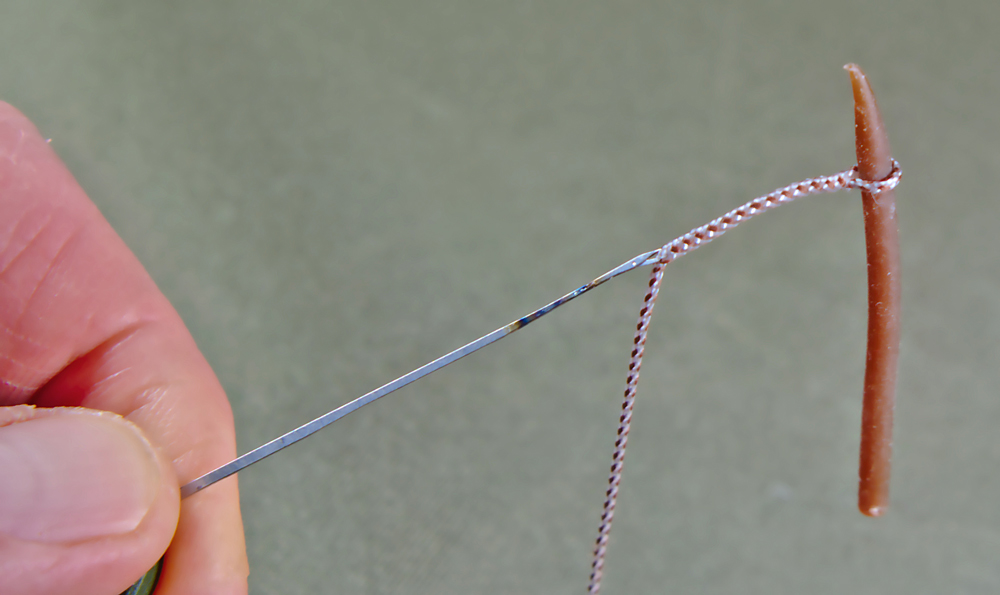
At a point just after the inner leadcore stops, push a fine gated latch needle (with the gate pulled fully back) into the hollow braid and carefully thread it down the center of the braid about an inch before pushing it through the wall of the braid to expose the needle again. (See 2 photo slide show below):
Trim the end of the braid to make it neat and tidy, then trap the end into gated splicing needle.While holding the section of the braid with the needle inserted, gently pull the needle back through the braid, pulling the trapped end with it. As shown below, it is a good idea to use a round tool or an anti-tangle sleeve in the forming loop so it doesn't pull all the way through.

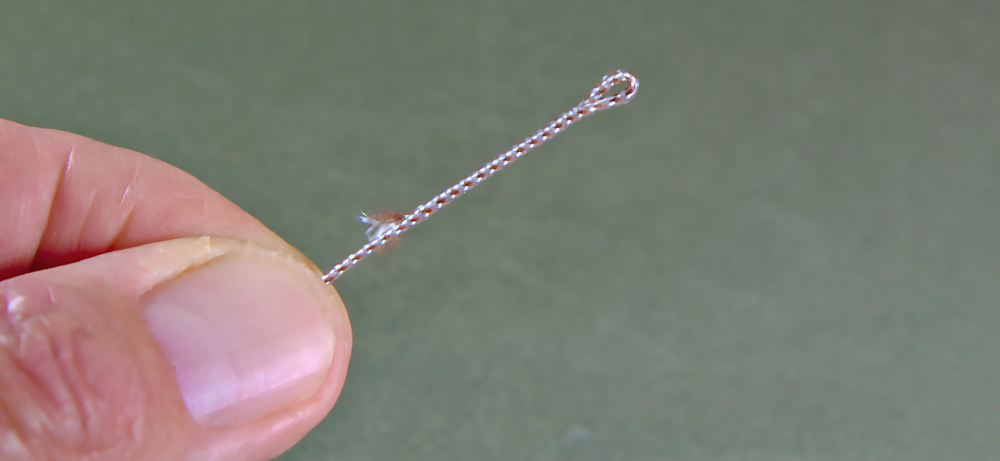
Pull the needle out of the entry hole with a small section of the braid's end, trim that tag end to neaten and we are left with a well constructed loop of approximately 1/8" on one end of the leadcore. A few small dabs of super glue may be added to the spliced length for added 'insurance' and confidence BUT it must never add to the thickness of the spliced section of leadcore. We add a couple of dabs, let it soak in a few seconds and then wipe all excess glue away with a cloth.
At this point, we can add a swivel to one end of the leadcore (but NEVER both ends, the mainline must be tied to the spliced loop end of the leadcore) by following one of the points below:
-We can add a swivel to this newly spliced end by passing the none looped end of the leadcore through one end of the swivel then through the loop in the leadcore we have just created and pulling tight.
-Alternatively, we can add a swivel to the other end of the leadcore length by following the splicing instructions above but placing a swivel onto the braid at Step #2 pictured above just before pulling the end of the braid through the center of the hollow braid when forming the 2nd loop.
-Note: Never tie the mainline from your rod & reel to the Swivel end of the leadcore. Only add a swivel to the lower end of the leadcore. The end that is tied to the mainline must be via the spliced loop only for safety's sake. This is to enable the hook length and any rubber beads used in the rig to slide off of the leadcore in the event of a mainline break, thus enabling the fish to rid itself of the lead weight and avoid being tethered to a lake bed snag via the leadcore rig and weight.
Leadcore can be used safely with a safety lead clip but again, care must be taken to ensure that the safety clip can slide over the spliced loop where it's tied to the mainline.
+ MAIN LINES OR REEL LINE
A mono filament based line in the 12 to 15 LB breaking strain range will cover you in close to 90% of your carp fishing situations. There are probably 40 or 50 different brands available Worldwide of purposely designed main lines for your carp angling needs. You can choose whichever is the best for you however it must be stated that here in the USA Berkley's "Trilene Big Game" (Green) in 15LB breaking strain is one of the most popular mono lines in use for carp angling. It is extremely strong, very abrasive resistant and readily available in most stores.
The question, “When should I use braid as opposed to Mono?” often comes up so here is a basic guideline in its use when Carp angling:
Braided line Pros:
- Have little or no Stretch to them and so are very sensitive to every knock and bait pick-up you may encounter. VERY sensitive.
- Very easy to cast distances due to extremely low diameter to breaking strain ratios, glides through the rod’s eyes without much friction and little to no memory.
- In weedy conditions, braid cuts through the weed very easily during the fish battle and retrieval of rigs for re-baiting etc.
- Knots, when tired correctly are less susceptible to strangulation weaknesses or stress points than the same knot tied in mono.
- Typically lasts much longer on your spool than mono.
Braided lines Cons: * Not good in rocky swims where there are sharp edges, this includes weedy areas containing Zebra mussels etc. So very susceptible to abrasion in certain conditions! - Much more visible to the fish than mono, not such a big deal here at home because most lakes aren’t that pressured for Carp yet and so the fish aren’t extremely spooky when encountering lines etc. but it’s still a feature worth considering.
- “Birds nests” or wind knots can be a persistent problem when using braid but we have found that wetting the braid on the reel with lake water before casting will eliminate this problem all together.
- Using braid is a lot tougher on all your gear and your body parts than mono when reeling in rigs for re-baiting or fighting a fish. Be extremely careful when casting or fighting a fish not to get a loop of line wrapped around your finger; at best, it will slice through your skin like a knife.
- Very expensive to spool up when compared to good mono prices.
- You can be very susceptible to heart breaking hook pulls, especially when the lunging carp is under the rod tip, nearing the net. This is again due to the near zero stretch qualities of braid. Clutch settings on your reel have to be precise.
- Due to braid’s lack of stretch, it typically requires more weight to hold bottom if there is heavy wave or wind action than mono. Mono will stretch before it moves the weight.
Looking and comparing the lists above, why would one ever use a braid when Carp fishing? - Some Anglers prefer the direct connection to the fish with braid because of the lack of stretch.
- Bite indication for sensitive biting fish is superior than mono.
- In weedy conditions and possibly when extra distance is needed during the cast to reach the fish on larger waters. By using our combined experiences, we’ve found that by tying a couple of rod lengths of mono (of appropriate breaking strain) onto the end of your braid main-line eliminates most of the “cons.”
In fact, we actively advise this whenever braid is used as a main line because the mono acts as a shock leader (Click here to see Shock leader section of web site) to absorb the strain of the cast when casting large weights/method/pack-baits. It also helps to absorb the fish’s lunging during the fight, especially when playing the fish under the rod tip, so you encounter far fewer hook pulls.
Because of its excellent abrasion resistance and shock absorbing qualities an excellent example of such a mono would be 30 LB P-Line CXX X-tra strong in Moss green. You could go down to 20 LB bs when using this line but please be mindful of the dangers of the line snapping or “cracking off” during the cast, sending your heavy lead weight and rig across to people on the other side of the lake or possibly towards a boat! Please be safe and rig accordingly.
Conversely, if you’re fishing in a weedy area with no sharp snags you can try putting a couple of rod lengths of braid onto your mono main line to take advantage of the braid’s ability to slice through the weed etc.
+ BAIT RUNNER / FREE RUNNING REELS
The reels most used around the world today for carp angling have a free running feature built in to them. i.e. They have the capacity to leave the spool un-locked but on a separate drag system while waiting for a bite. Thus, being able to give line to the fish as the carp picks the bait up, bolts and runs. This important feature enables the angler a little more "freedom" in his/her swim to also concentrate on some other fishing related tasks while waiting for a bite. This feature also alleviates the worry about missing a bite and possibly losing an expensive rod and reel combo' via the carp actually dragging it into the lake/river.
Take a look at the following link Link to Reel History here It'll give you a very good idea on how we arrived at this free running reel with a 2nd drag system at this point in time. It's a very interesting time line to see and helps us appreciate the progress over the last 100 years or so...
You may be thinking to yourself, "losing a rod can never happen to me! I always set my drag loose enough for the carp to take line when it bites..." Well, if you use a traditional, closed bail spinning reel with a front or rear drag that is loosened enough allow the spool to turn and give line when a run happens, you'll probably be fine 95% of the time if you're literally "sat on top" of your rod, concentrating on the rod tip movement. When that bite does happen, you must pick the rod up and at the same time, tighten the drag while hoping the resultant drag tension was appropriate to prevent line breakage during the carp's initial run and lunges
Typically, though, the bite doesn't happen until you're attending to some other aspect of your angling day, usually when you're stood 10 or 15 yards away from your rods ;) As already mentioned, the initial run from a Carp bite can be so shockingly powerful that it's unlikely you'll be able to get back to your rods in time to prevent disaster! Worst case scenario; immediately the inertia of the run hits your rod, your loosely set spool turns faster than the outgoing line and you get a backlash, causing a bird’s nest of sorts. This knot/tangle either locks your reel up tight or it manages to travel and then gets caught on the butt ring or the next eye up on your rod, locking everything up. Your favorite rod and reel then gets launched at a jaw dropping velocity into the dark depths of the lake/river like a missile, completely ruining your day!
Using a reel with two drags; the first one, a standard front drag operates the spool as normal to help control line from the spool during a good fish battle to the bank. The 2nd drag is called the free-runner or what Shimano have patented and trademarked as the name, "Baitrunner" is the drag you set after casting your bait out to allow the spool to give line during the carp's initial bite and run. After the run and you've picked your rod up to begin the fight you typically disengage this 2nd drag by either turning the reel handle, twisting a dial on top of the spool or flipping a switch (depending on reel manufacturer).
A friendly piece of advice is to always get into the habit of checking both drags after every time you cast your bait in. Even the best free runner reels can't help you if they're not set correctly. So, get into the habit of doing the following check list after every cast:
- Check your regular drag will give line well before the tension hits the line's breaking strength (BS)
- Then engage the 2nd (Free Runner) drag.
- After placing your rod down on it's resting area, then check that the 2nd drag is loose enough to allow the carp to easily take line during it's 1st powerful bolt/run.
The purchase of a good quality reel with a two drag system (Free Runner/Bait Runner) allows for more flexibility to adjust the drag to the situation you are faced with at any time. A long 50 or 60 yards run by a powerful carp can cause cheaper reels to heat up, destroying drag washers and even bearings or even the complete loss of your rod/reel. The purchase of a good quality, purpose made free runner reel will help provide an extra level of confidence for anglers of every experience level that want to try their hand at catching this awesome sports fish.
CLICK IMAGES TO ENLARGE


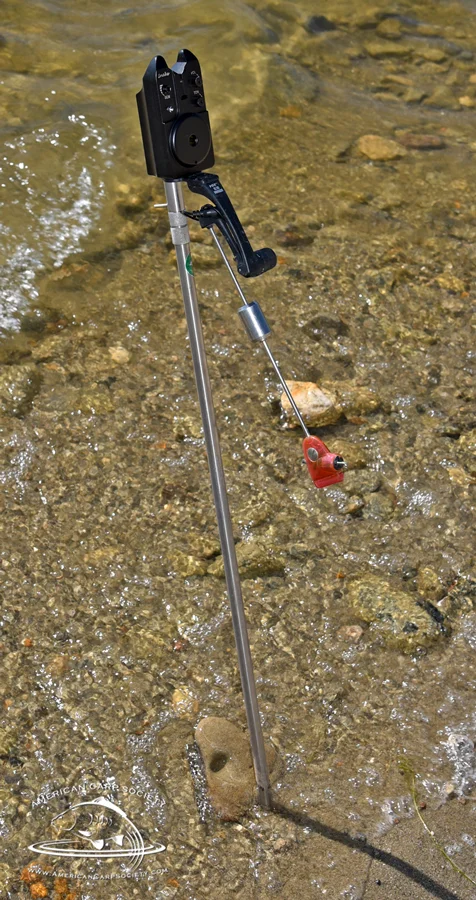
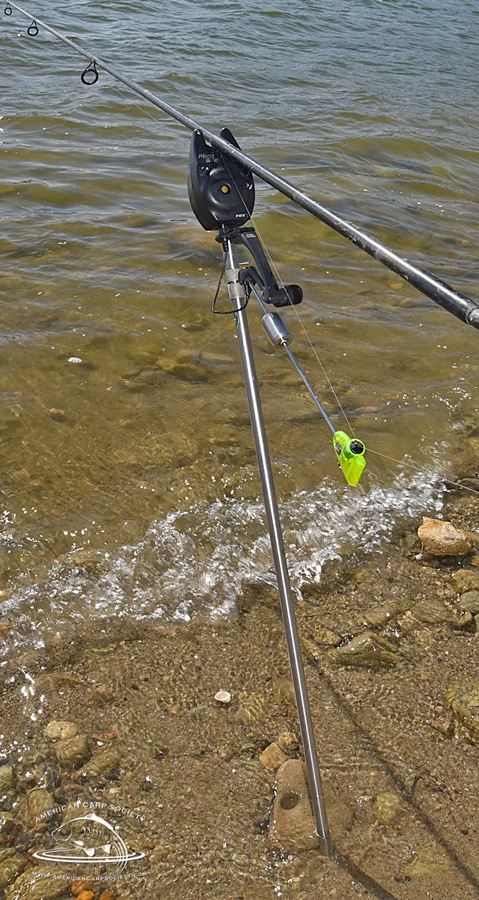
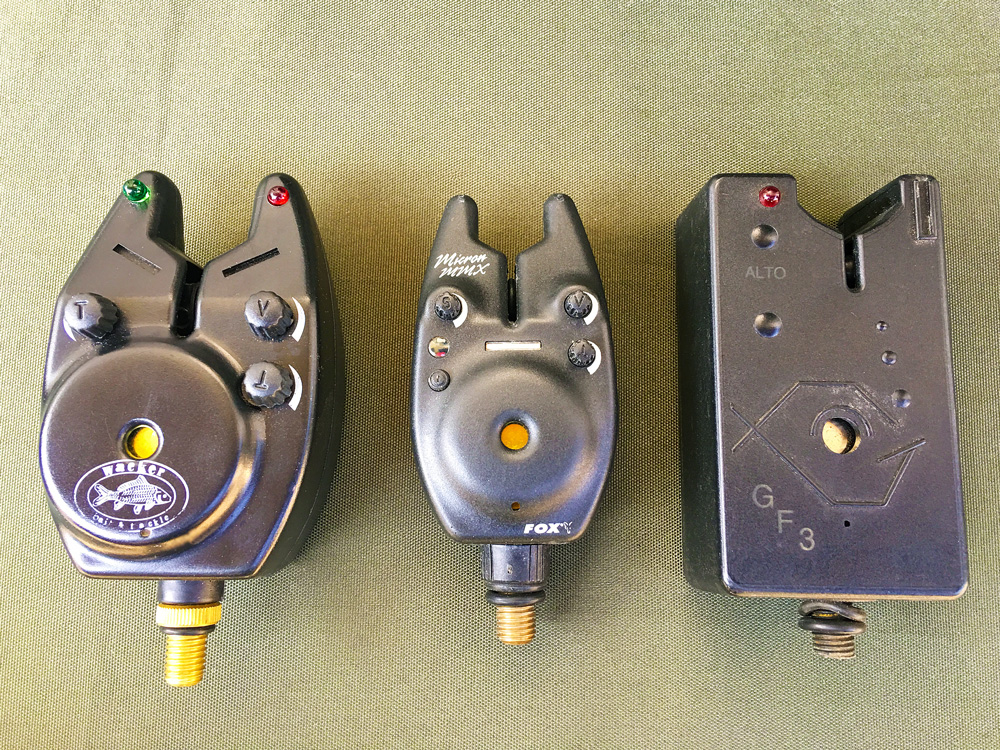
Bite alarms come in many shapes, sizes and prices. Depending on how many "bells and whistles" are incorporated within the alarm, they can cost anywhere from $20 up to nearly $200 each.
You do get what you pay for when purchasing bite alarms. They all carry out the same basic function; that is, they all make an audible (buzzing alarm) and visual (flashing LED light) indication when you have a bite by sensing the line's movement caused by the fish picking up your baited hook, thus moving the fishing line in some way.
TYPICAL BITE ALARMS


Some manufacturers have designed and manufactured alarms where the unit shows you have a bite via the fishing line running over a sensitive, magnetic roller that turns when the fish pulls the line to active the alarm. Others have the line passing over a digital sensing device built into a slit in the alarm. Both approaches detect even the slightest vibrations/movement of the line during a bite while the rod rests on an angle up against the alarm.
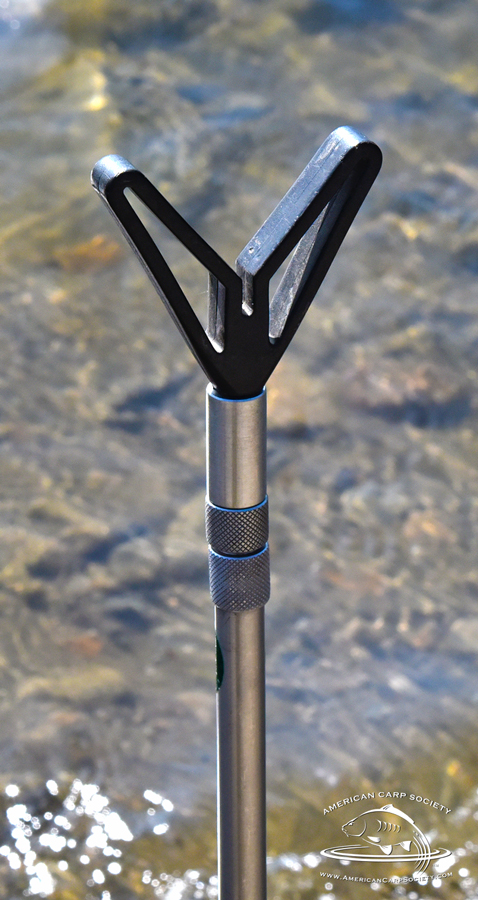
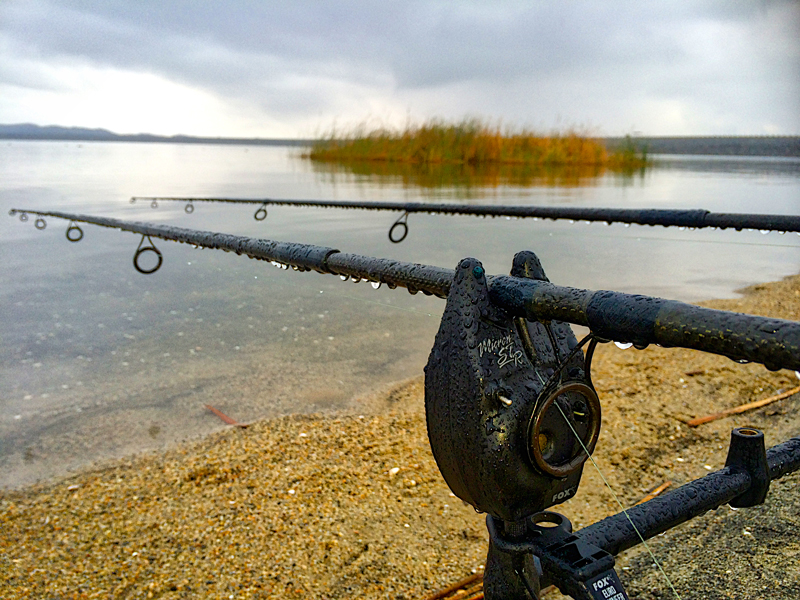
The alarms can be screwed onto one of many specially manufactured bank sticks which are pushed into the bank as you would a 'Y' stick or tree branch for your rod to rest on. Bank sticks are usually adjustable and have a cam lock or locking nut that allows an inner stick to telescope outward and lock in place as you adjust its length.

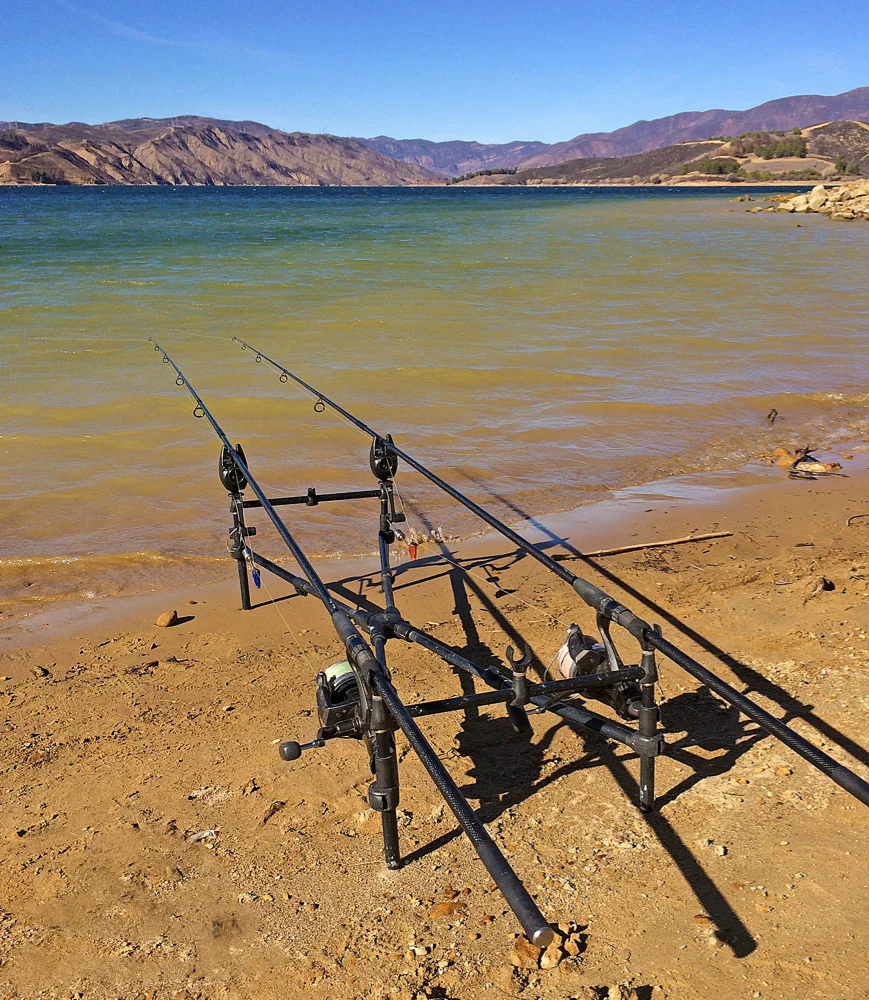
The other choice is to purchase a Rod Pod, which is basically a fully adjustable rack into which the alarm(s) are screwed into on one end of the Pod and then the rod(s) lay horizontally on top of the alarm with the butt of the rod resting in a butt rest located at the back end of the pod.
All alarms will sound off a loud, continuous “scream” on a run and will also give you a single beep or two when a fish just taps the bait. At night, in complete darkness, both these features are even more valuable along with the LED lighting up when a fish hits or runs. Most alarms offer you a volume dial and a tone adjusting dial which is very useful because you can set one alarm to a high pitch and the other to a low pitch which makes it easier to determine which rod had the bite in a panicked moment or two. Another very common and most useful feature is a sensitivity dial which allows you to adjust the alarm's sensitivity. e.g. when fishing in very windy conditions, thus avoiding many annoying false bite beeps and lights caused by the windy or heavy tow weather conditions.


High end versions also have a wireless transmitter feature built into the alarm that sends a signal to a remote sensing, hand held receiver. These receivers generally have independently set, volume, tone, and a vibration only features. This is very handy either during the day or at night when you're taking a quick 40 wink nap or making a cup of coffee several yards from your rods and don't want to advertise your presence in that part of the lake or the fact that this is your 12th fish of the session to all your neighboring/competing anglers etc. In these cases, you can turn down the volume of the actual alarm unit so as to "not wake" up the whole lake with the screaming sounds of a Carp bite/run, instead the alarm sends a discrete radio signal to your remote receiver.
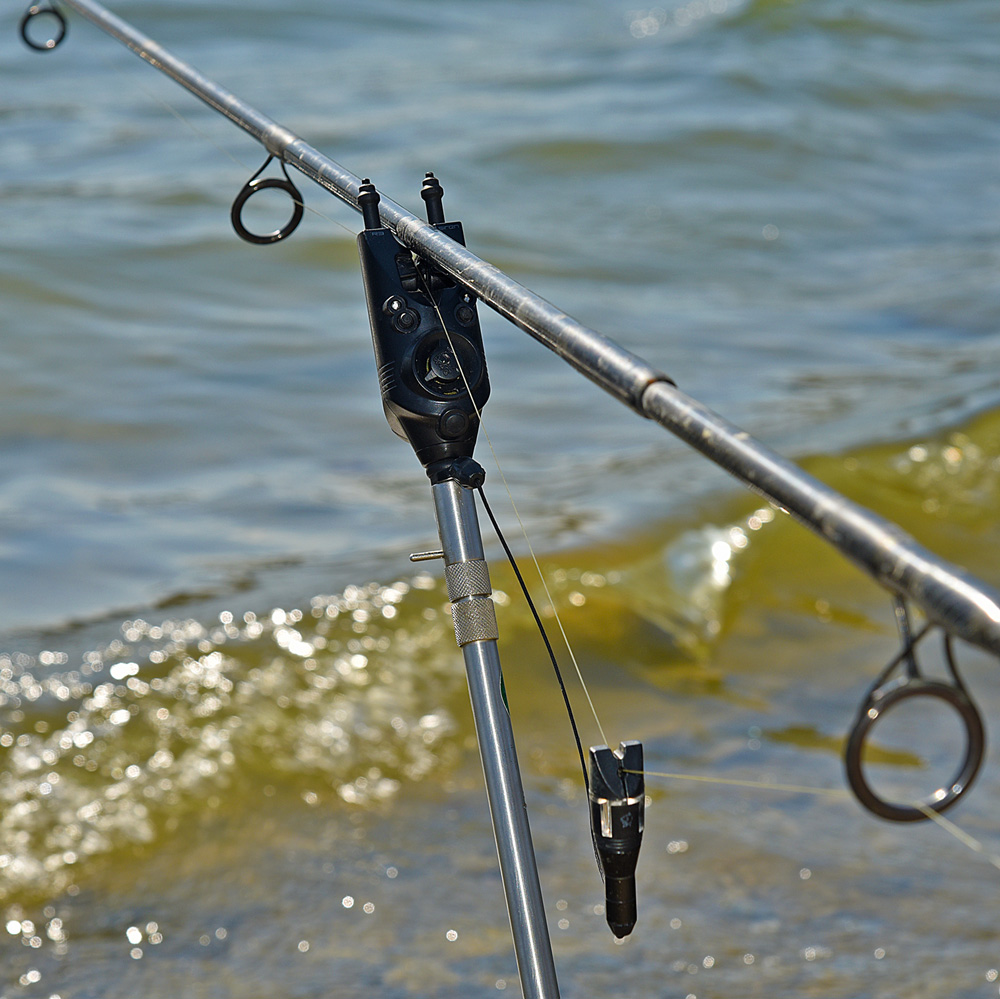
One other piece of important equipment that is usually associated and works in tandem with our bite alarms is the Hanger and/or Swinger. Here are a couple of photos to show you what we're talking about if you're completely new to the sport and then we'll get into the descriptive narration on why they are used.

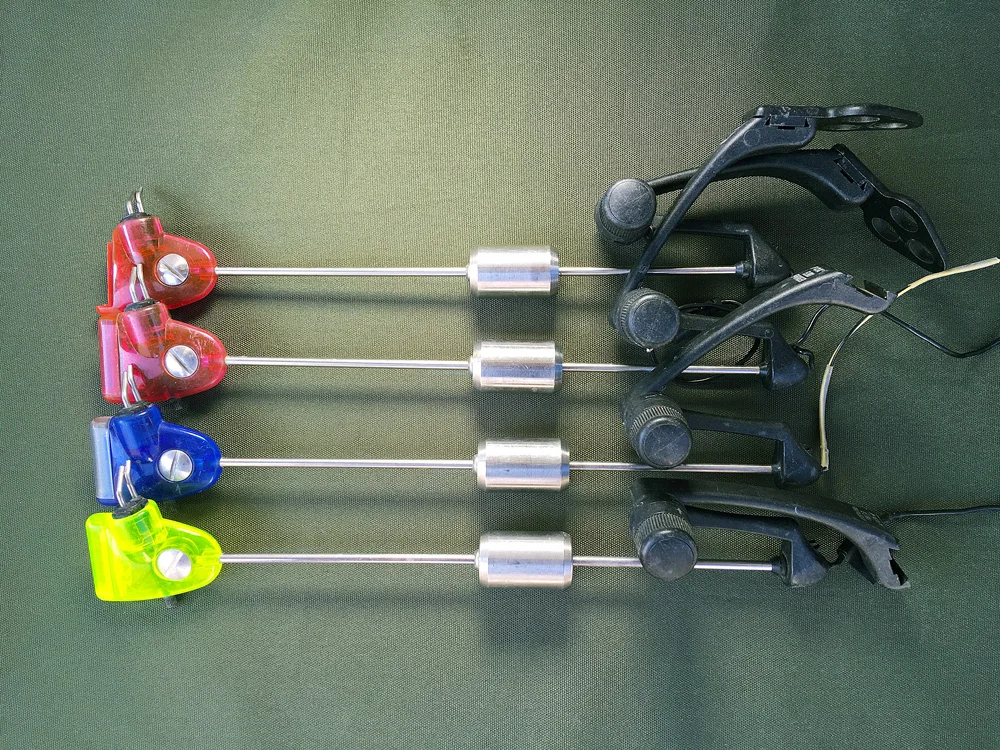

While both Hangers (sometimes referred to as Bobbins) and Swingers basically do the same job of enhancing the effectiveness of your bite alarms by adding a small weight and thus a little extra tension to your main line. They do each act differently in differing fishing conditions and each angler will develop their own preferences as to which they prefer over time. Both are attached between the bite alarm and either the bank stick or Pod via a mounting bracket, the other end of the Swinger or Hanger (the head) is clipped onto the line either just before or just after the Butt ring. You can purchase either unit with a small LED light in the head that lights up in tandem with the LED on the alarm. These are powered via the alarm and usually connected to the alarm by a 1/8" jack plug. Very handy when fishing during the hours of darkness!


The Hanger generally has a flexible cord made from either rubber, chain links, nylon woven string or some other kind of flexible material to connect its bobbin/head to the mounting bracket. The only slight disadvantage to Hangers is the fact that the wind can blow them about causing annoying, false bites in a very windy day but most manufacturers design them so you can purchase small 5-gram add-on weights for the head to help alleviate this problem. The Swingers have a rigid arm attaching its head to the mounting bracket with a sliding counter balance weight which stops the wind blowing it about and affecting the bite indication.
When a fish bites or even just inspects your baited hook, the tension of the line changes and these Swinger/Hanger devices help transmit these slight line movements into another visual clue for the attentive angler via movement either up or down of the swinger/Hanger's head that is clipped to the line. Of course, the bite alarm also sounds and lights up too but you can never have too much bite indication help on your side.
When the bite turns into a fully-fledged run and you pick up the rod to connect with the fish, both devices are designed to easily disconnect and fall from the line without any snagging or complications.
Another major advantage of using a Swinger or Hanger in addition to your bite alarms is for detection of what is called a drop back.
A drop back is a bite where the carp picks up your bait and travels directly towards you and your rods, thus causing a complete slack line situation. In this scenario, it is unlikely that you will get much more than a single beep or two from your electronic bite alarms. When you're using a Swinger/Hanger, the weight of the unit's head pulls the line down due to the slack line situation and sounds the bite alarm. See the short video below to see this in action.
While it may be obvious and self-explanatory to some reading this, if you are new to the sport, an explanation is in order:
Rod Pods and Bank sticks are specially manufactured frames and/or sticks that the alarms and Swingers/Hangers are attached to and provide a stable resting platform for your rod & reel to rest in while fishing.
Note: you'll often hear the term, 'Buzz bars' in connection to discussion or chats about pods. These items are simply the two cross bars; one at the front of the rod pod which holds the alarms and the one across the back of the rod pod that the rod butt holders screw into. It should also be noted that not all Rod Pod manufacturers include buzz bars with the pods, making them an additional purchase. Since you can get a 2, 3 or 4 rod buzz bar, it is often left up to the customer to decide which configuration they wish to purchase.
Rod Pods like the examples pictured below offer a stable platform to rest your rods and are made in various designs and features.
The main advantages to using a Rod Pod over multiple, single bank sticks for your multiple rod set-up are:
Rod pods make fishing with multiple rods much easier and organized.
Enables you to fish from a concrete bank or an uneven, rocky bank because each leg on the Pod is adjustable in height.
By changing the length of the back legs and making them longer than the front, the rod tips can be pointed at the water during windy conditions or you can have the rods parallel to the water level on calmer days. On some models, it's possible to have the rod tips way up and pointing towards the sky to have the angle of your line at more of an angle to you baits, thus having the line miss possible snags like rocks or weeds.
The length of most pods can be changed to accommodate rods of most sized from 6' to up to 13'
The buzz bars that hold the alarms (at the front of the pod) and butt rests (at the rear of the pod) can be changed to accommodate 2, 3 or even 4 rods.


· Bank sticks are simply a long spike that is pushed into the ground with a threaded section at the top to screw in a Bite Alarm or simple 'Y' shaped rod rest. We've all used the bank sticks that nature provides, a tree branch with a 'Y' at the top that we've sat the rods into while waiting for a bite. A bank stick is merely a purpose made, well manufactured version.
· Most bank sticks are adjustable in height enabling the angler to choose the angle of the rod and line to the water. This can be important in windy conditions where we need to keep as much of the line as possible out of the strong winds to avoid false bite indications by dipping the rod tips down near or into the water. Alternatively, we might need to have the rod tips very high to have the line miss or avoid nearby snags and weed.
· Carp anglers will usually use two bank sticks per rod, one to support each end of the rod and will require the angler to purchase a 'V' shaped rod rest and/or an electronic bite alarm to screw into the top of each bank stick for the rod to sit into. Although a hanger or a swinger is not necessary when using an electronic bite alarm, they do help keep tension on the line and aid in the detection of drop-back bites. A drop back bite is where the carp picks up the bait and moves towards the angler and the rods on the bank creating a slack line situation. In this case, the weight of the hanger or swinger drops because there is no longer tension on the line and pulls the line through the bite detector sounding the alarm. An example of this is shown in the short video below...